|
Size: 3120
Comment:
|
Size: 4363
Comment:
|
| Deletions are marked like this. | Additions are marked like this. |
| Line 39: | Line 39: |
| 9. Use the arrow keys to highlight ''clonezilla-start''. Press '''Enter'''. Use the arrow keys to highlight ''Beginner Mode''. Press '''Enter''' 10. From this window we have a variety of options. Since we are going to be taking an image, highlight ''save-disk'' and press '''Enter'''. Later on when you are deploying your saved image the ''restore-disk'' option will be used. 11. Highlight ''Now_in_server'' and press '''Enter'''. This interface is particularly poor so be careful when entering the name of the image!! Click the right arrow key a few times to ensure you are at the end of the pre-designated file name. Hold down the '''Backspace''' until the cursor stops moving to delete the file name. Images are named {{{<level>-<semester><year>-rev<n>}}}. The parts are ''level'', "adv" or "intro"; ''semester'', "fall" or "spring"; ''year'', "2010", for example; ''n'' is a revision number, used only for small changes to the same basic image. If we are making an image of the introductory computers for the Spring of 2015, for example, the name would be ''intro-spring15'' as is shown below. Remember, the interface is broken so it will not look correct. [[attachment:Name.png|{{attachment:Name.png||width=500 height=237}}]] |
Computer Imaging
This guide is intended for both refreshing and teaching the computer imaging process to student hourlys who do not require an in-depth understanding of the process. Make sure to read the entire guide before attempting to image computers as mistakes can cost large amounts of time and be of great inconvenience.
Contents
Making the Image
Taking the Image
To take an image you will be utilizing a program called clonezilla. This program is only available by remotely connecting to DRBL via another program called SecureCRT. Clonezilla has a fairly broken user interface so do not be alarmed if numbers, words, etc do not appear correctly; after brief exposure to the program and it shouldn't phase you much.
1. On the computer you will be taking the image of, search for "SecureCRT 6.5" under the windows button on the lower left corner of the desktop; open SecureCRT 6.5. If it asks to check for updates simply ignore. A "Connect" window should appear.
2. Connect to drbl.physics.wisc.edu
3. Log in with your username and password. Don't have one, talk to your boss and he will redirect you someone who can create an account.
4. Enter the command sudo /opt/drbl/sbin/dcs into the SecureCRT command window. A user interface, like the one pictured below, should appear. From here on you will be utilizing the arrow keys, space bar, tab, and enter buttons on your keyboard to navigate the menus.
5. Use the arrow keys to highlight the Part Select Client(s).... command. Press Enter. A new window should appear explaining you can create new IP addresses, ignore and simply press Enter.
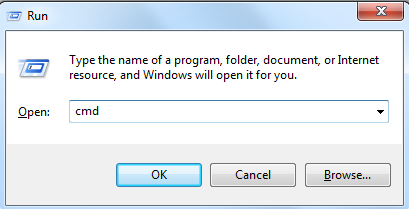
6. Hit Windows Key + R to open the run window. Type cmd and press Ok. This opens up the control terminal for the computer you are currently on. This is necessary in determining the IP address.
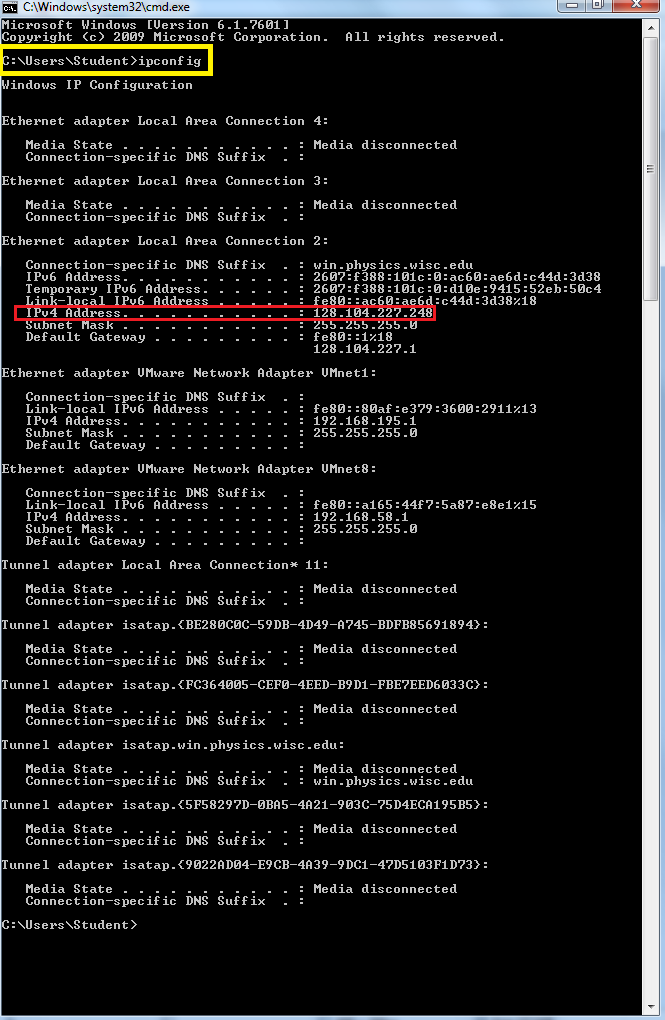
7. Type ipconfig in the command window and press Enter. You should see something similar to what you see below. Find the IPv4 Adress that begins with 128.104.227. The last three numbers, 248 in the example below, is the number you want to remember.
8. Go back to your SecureCRT 6.5 window and use the arrow keys to find the IP address that corresponds to the number you just found. Once found, click the space bar. If done correctly, an asterisk should appear in or next to the box as can be seen below. Once done, press Tab and then press Enter.
9. Use the arrow keys to highlight clonezilla-start. Press Enter. Use the arrow keys to highlight Beginner Mode. Press Enter
10. From this window we have a variety of options. Since we are going to be taking an image, highlight save-disk and press Enter. Later on when you are deploying your saved image the restore-disk option will be used.
11. Highlight Now_in_server and press Enter. This interface is particularly poor so be careful when entering the name of the image!! Click the right arrow key a few times to ensure you are at the end of the pre-designated file name. Hold down the Backspace until the cursor stops moving to delete the file name. Images are named <level>-<semester><year>-rev<n>. The parts are level, "adv" or "intro"; semester, "fall" or "spring"; year, "2010", for example; n is a revision number, used only for small changes to the same basic image. If we are making an image of the introductory computers for the Spring of 2015, for example, the name would be intro-spring15 as is shown below. Remember, the interface is broken so it will not look correct.
Image Deployment
Computer Preparation
Pushing the Image


