|
Size: 1824
Comment:
|
← Revision 9 as of 2013-07-12 18:17:38 ⇥
Size: 1809
Comment: converted to 1.6 markup
|
| Deletions are marked like this. | Additions are marked like this. |
| Line 2: | Line 2: |
| ||<:30%>[:PiraScheme#Mechanics: Table of Mechanics Demonstration]||<:30%>[:MEEquipmentList: List of Mechanics Equipment & Supplies]||<:30%>[:Demonstrations:Lecture Demonstrations]|| | ||<:30%>[[PiraScheme#Mechanics| Table of Mechanics Demonstration]]||<:30%>[[MEEquipmentList| List of Mechanics Equipment & Supplies]]||<:30%>[[Demonstrations|Lecture Demonstrations]]|| |
| Line 4: | Line 4: |
| = Demo Name, 1A20.41a = | = Vernier Calipers, 1A20.41a = '''Topic and Concept:''' Measurement, [[Measurement#ErrorAccuracy| 1A20. Error and Accuracy]] |
| Line 7: | Line 11: |
| * '''Cabinet:''' [:MechanicsCabinet:Mechanic (ME)], Waves & Sound (WS).... * '''Bay:''' (A? or B?) Like [:MechanicsCabinetBayA1:(A1)] * '''Shelf:''' #1,2,3.. (Use "T" for items that are on top of that cabinet bay) |
* '''Cabinet:''' [[MechanicsCabinet|Mechanic (ME)]] * '''Bay:''' [[MechanicsCabinetBayA3|(A3)]] * '''Shelf:''' #2 |
| Line 11: | Line 15: |
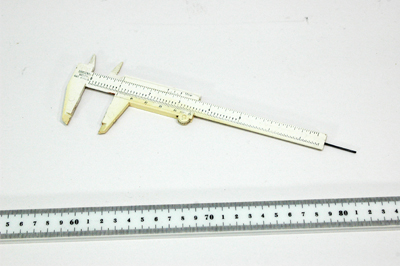
| (attachment photo showing the fully set up demonstration) | {{attachment:VernierCalipers-01-400.jpg}} |
| Line 13: | Line 17: |
| '''Description:''' | '''Abstract:''' |
| Line 15: | Line 19: |
| Insert description of apparatus, its component, what it is demonstrating. | This plastic vernier calipers can be used to show its proper operation. |
| Line 19: | Line 23: |
| ||Vernier Caliper||ME, Bay A3, Shelf #2||1A20.41a || | ||Vernier Caliper||[[MechanicsCabinet|ME]], [[MechanicsCabinetBayA3|Bay A3]], Shelf #2||1A20.41a || |
| Line 23: | Line 27: |
| A. '''''This demonstration requires a minimum 24 hour notice.''''' * '''''This demonstration requires LN2''''' * '''''Back-to-Back lectures is NOT possible; We'll do one lecture one day and the other the next day.''''' |
* N/A |
| Line 27: | Line 29: |
'''Setup:''' |
'''Setup and Procedure:''' |
| Line 31: | Line 32: |
| 1. Measure the items explaining how you are taking the measurement and what the result is. | |
| Line 33: | Line 35: |
| 1. N/A | * N/A |
| Line 35: | Line 38: |
| '''Demonstration:''' | '''Discussion:''' |
| Line 37: | Line 40: |
| There is a written instructional page that explains how to read a micrometer caliper in the micrometer's box. The box also contains a decimal Equivalents table. | There is a written instructional page that explains how to read a micrometer caliper in the micrometer's box. The box also contains a decimal equivalents table. |
| Line 41: | Line 44: |
| ||attachment other photos||attachment other photos|| ||attachment other photos||attachment other photos|| |
'''Videos:''' * [[https://www.youtube.com/user/LectureDemostrations/videos?view=1|Lecture Demonstration's Youtube Channel]] |
| Line 45: | Line 50: |
1. List any references |
* [[https://en.wikipedia.org/wiki/Caliper|Caliper - Wikipedia]] |
| Line 49: | Line 53: |
| [:Instructional:Home] | [[Instructional|Home]] |
Vernier Calipers, 1A20.41a
Topic and Concept:
Measurement, 1A20. Error and Accuracy
Location:
Cabinet: Mechanic (ME)
Bay: (A3)
Shelf: #2

Abstract:
This plastic vernier calipers can be used to show its proper operation.
Important Setup Notes:
- N/A
Setup and Procedure:
- Set out the Vernier Caliper with some miscellaneous items to measure.
- Measure the items explaining how you are taking the measurement and what the result is.
Cautions, Warnings, or Safety Concerns:
- N/A
Discussion:
There is a written instructional page that explains how to read a micrometer caliper in the micrometer's box. The box also contains a decimal equivalents table.
A micrometer is used to measure thickness very accurately. This tool cannot be seen in a big class unless one uses the video system or lets the students come down to look at it.
Videos:
References: