|
Size: 1478
Comment:
|
← Revision 5 as of 2013-07-12 18:18:16 ⇥
Size: 1710
Comment: converted to 1.6 markup
|
| Deletions are marked like this. | Additions are marked like this. |
| Line 2: | Line 2: |
| ||<:30%>[:PiraScheme#Mechanics: Table of Mechanics Demonstration]||<:30%>[:MEEquipmentList: List of Mechanics Equipment & Supplies]||<:30%>[:Demonstrations:Lecture Demonstrations]|| | ||<:30%>[[PiraScheme#Mechanics| Table of Mechanics Demonstration]]||<:30%>[[MEEquipmentList| List of Mechanics Equipment & Supplies]]||<:30%>[[Demonstrations|Lecture Demonstrations]]|| |
| Line 6: | Line 6: |
'''Topic and Concept:''' Measurement, [[Measurement#ErrorAccuracy| 1A20. Error and Accuracy]] |
|
| Line 7: | Line 12: |
| * '''Cabinet:''' [:MechanicsCabinet:Mechanic (ME)] * '''Bay:''' [:MechanicsCabinetBayA3:(A3)] |
* '''Cabinet:''' [[MechanicsCabinet|Mechanic (ME)]] * '''Bay:''' [[MechanicsCabinetBayA3|(A3)]] |
| Line 11: | Line 16: |
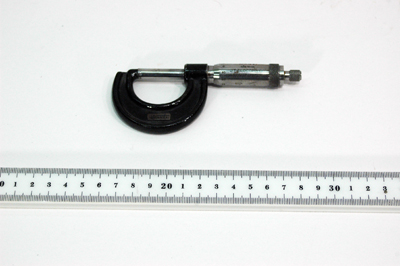
| (attachment photo showing the fully set up demonstration) | {{attachment:Micrometer-01-400.jpg}} |
| Line 13: | Line 18: |
| '''Description:''' | '''Abstract:''' |
| Line 15: | Line 20: |
| Insert description of apparatus, its component, what it is demonstrating. | Demonstrate the use of a micrometer calipers. |
| Line 19: | Line 24: |
| ||Micrometer||ME, Bay [:MechanicsCabinetBayA3:A3], Shelf #2|| 1A20.41d|| | ||Micrometer||[[MechanicsCabinet|Mechanic ME]], [[MechanicsCabinetBayA3|Bay A3]], Shelf #2||1A20.41d|| |
| Line 23: | Line 28: |
| A. N/A | * N/A |
| Line 25: | Line 30: |
| '''Setup:''' 1. N/A |
'''Setup and Procedure:''' 1. Please review the written instructional page within the micrometer's box that explains how to read a micrometer caliper. The box also contains a decimal Equivalents table. 1. Measure the thickness of a few objects explaining the usage of the micrometer. |
| Line 30: | Line 35: |
| 1. N/A | * N/A |
| Line 32: | Line 37: |
| '''Demonstration:''' Please review the written instructional page within the micrometer's box that explains how to read a micrometer caliper. The box also contains a decimal Equivalents table. |
'''Discussion:''' |
| Line 38: | Line 41: |
| ||attachment other photos||attachment other photos|| ||attachment other photos||attachment other photos|| |
'''Videos:''' * [[https://www.youtube.com/user/LectureDemostrations/videos?view=1|Lecture Demonstration's Youtube Channel]] |
| Line 42: | Line 45: |
| * [[https://en.wikipedia.org/wiki/Micrometer|Micrometer - Wikipedia]] | |
| Line 43: | Line 47: |
| 1. List any references [:Instructional:Home] |
[[Instructional|Home]] |
Calipers, Micrometer, 1A20.41d
Topic and Concept:
Measurement, 1A20. Error and Accuracy
Location:
Cabinet: Mechanic (ME)
Bay: (A3)
Shelf: #2

Abstract:
Demonstrate the use of a micrometer calipers.
Equipment |
Location |
ID Number |
|
|
|
Micrometer |
Mechanic ME, Bay A3, Shelf #2 |
1A20.41d |
Important Setup Notes:
- N/A
Setup and Procedure:
- Please review the written instructional page within the micrometer's box that explains how to read a micrometer caliper. The box also contains a decimal Equivalents table.
- Measure the thickness of a few objects explaining the usage of the micrometer.
Cautions, Warnings, or Safety Concerns:
- N/A
Discussion:
A micrometer is used to measure thickness very accurately. This tool cannot be seen in a big class unless one uses the video system or lets the students come down to look at it.
Videos:
References: