|
Size: 1493
Comment:
|
← Revision 11 as of 2013-07-12 18:17:56 ⇥
Size: 2601
Comment: converted to 1.6 markup
|
| Deletions are marked like this. | Additions are marked like this. |
| Line 2: | Line 2: |
| ||<:30%>[:PiraScheme#Mechanics: Table of Mechanics Demonstration]||<:30%>[:MEEquipmentList: List of Mechanics Equipment & Supplies]||<:30%>[:Demonstrations:Lecture Demonstrations]|| | ||<:30%>[[PiraScheme#Mechanics| Table of Mechanics Demonstration]]||<:30%>[[MEEquipmentList| List of Mechanics Equipment & Supplies]]||<:30%>[[Demonstrations|Lecture Demonstrations]]|| |
| Line 7: | Line 7: |
| Applications of Newton's Laws, [:AppNewtonsLaws#Friction: 1K20 Friction] | Applications of Newton's Laws, [[AppNewtonsLaws#Friction| 1K20 Friction]] |
| Line 10: | Line 10: |
| * '''Cabinet:''' [:MechanicsCabinet:Mechanic (ME)] * '''Bay:''' [:MechanicsCabinetBayA1:(A1)] * '''Shelf:''' #1,2,3.. |
* '''Cabinet:''' [[MechanicsCabinet|Mechanic (ME)]] * '''Cubby:''' (C4) |
| Line 14: | Line 13: |
| attachment: mainPhoto | {{attachment:PlaneSetup-400.jpg}} |
| Line 18: | Line 18: |
| An inclined plane is raised until a block starts to slide. | An inclined plane with a block resting on top is raised until the block begins to slide. |
| Line 22: | Line 22: |
| ||apparatus||ME, Bay B1, Shelf #2|| || ||all other parts||ME, Bay B1, Shelf #2|| || ||...||ME, Bay B1, Shelf #2|| || |
||Inclined Plane||ME, Cubby C4|| || ||Block||ME, Cubby C4|| || ||Protractor||ME, || || ||Jack Stand||ME, || || |
| Line 33: | Line 34: |
| 1. List steps for setup then procedure. 1. ... |
1. Set out an inclined plane with the wood block or any other block. 1. Slowly lift by hand or use a jack stand if desired to slowly raise the plane until the block begins to slide down. 1. One can use a protractor to measure the angle of repose if desired. Using the jack stand in step 2 will help the accuracy of this step. |
| Line 37: | Line 39: |
| * | * N/A |
| Line 42: | Line 44: |
| Discuss the physics behind the demonstration, explaining some of the various steps of the demonstration when appropriate. | As the angle of plane relative to the table is increased, there is less normal force on the block due to the plane and therefore less static friction between the block and the plane. An added effect is the increasing magnitude of the component of the force of gravity down the plane. The angle of repose is the critical angle where the gravitational force down the plane on the block is just enough to overcome the frictional force. This angle will differ depending on the normal force on the block being used(i.e. it's mass) and the material-dependent interaction between the two surfaces (i.e. the coefficient of static friction of the block). |
| Line 44: | Line 46: |
| ||attachment: photo||attachment: photo||attachment: photo||attachment: photo|| | Note: A free body diagram would be a good tool to describe the forces acting on the block before and after the block starts to slide. {{attachment:FreeBodyDiagram-250.png}} ||{{attachment:IncPlane01-250.jpg}}||{{attachment:Platform01-250.jpg}}||{{attachment:Protractor02-250.jpg}}||{{attachment:Block01-250.jpg}}|| |
| Line 47: | Line 53: |
| * [https://www.youtube.com/user/LectureDemostrations/videos?view=1 Lecture Demonstration's Youtube Channel] | * [[https://www.youtube.com/user/LectureDemostrations/videos?view=1|Lecture Demonstration's Youtube Channel]] |
| Line 51: | Line 57: |
| * List any references | * [[http://simple.wikipedia.org/wiki/Inclined_plane|Inclined Plane - Wikipedia]] |
| Line 54: | Line 60: |
| [:Instructional:Home] | [[Instructional|Home]] |
Angle of Repose, 1K20.35
Topic and Concept:
Applications of Newton's Laws, 1K20 Friction
Location:
Cabinet: Mechanic (ME)
Cubby: (C4)
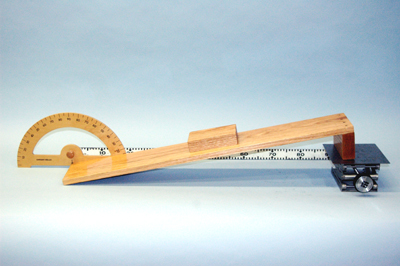
Abstract:
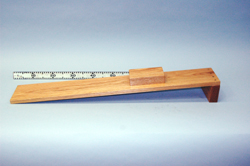
An inclined plane with a block resting on top is raised until the block begins to slide.
Equipment |
Location |
ID Number |
|
|
|
Inclined Plane |
ME, Cubby C4 |
|
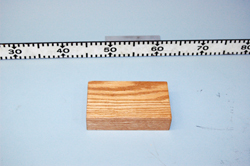
Block |
ME, Cubby C4 |
|
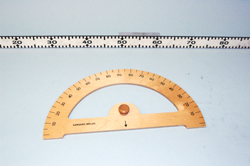
Protractor |
ME, |
|
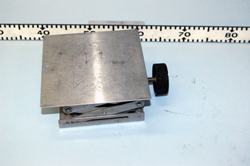
Jack Stand |
ME, |
|
Important Setup Notes:
- N/A
Setup and Procedure:
- Set out an inclined plane with the wood block or any other block.
- Slowly lift by hand or use a jack stand if desired to slowly raise the plane until the block begins to slide down.
- One can use a protractor to measure the angle of repose if desired. Using the jack stand in step 2 will help the accuracy of this step.
Cautions, Warnings, or Safety Concerns:
- N/A
Discussion:
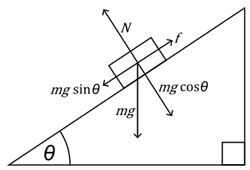
As the angle of plane relative to the table is increased, there is less normal force on the block due to the plane and therefore less static friction between the block and the plane. An added effect is the increasing magnitude of the component of the force of gravity down the plane. The angle of repose is the critical angle where the gravitational force down the plane on the block is just enough to overcome the frictional force. This angle will differ depending on the normal force on the block being used(i.e. it's mass) and the material-dependent interaction between the two surfaces (i.e. the coefficient of static friction of the block).
Note: A free body diagram would be a good tool to describe the forces acting on the block before and after the block starts to slide.
|
|
|
|
Videos:
References:
